Saturday, November 29, 2014

Bathroom Storage Outside the Bathroom

There is very little storage space in the upstairs bathroom so we have been discussing what sort of cabinet might sit just outside the bathroom to hold toiletries (i.e., extra TP and other stuff) but not look too awful. 

The requirements for whatever we get are:

  • It must be under 36" wide.
  • It must be around 16" deep or less.
  • It must look nice / not too cabinetty because it is sitting in V's office/salon

I saw this at Ikea yesterday (B is doing his best Vanna).  I like the look.  If it were solid pine or any other wood, I would have bought it on the spot.  But it isn't.  It is particle board and not very stable and I don't really want to drop $160 on something that feels this wobbly.


What I do like about it is that it has solid doors on the bottom and glass doors on top.  That way things we don't want to display are in the lower cabinet and whatever other junk/objet are in the upper shelves.  Also, since our daughter is small but adventurous and into everything (or maybe just banging into everything), I don't really want the lower cabinet doors to be made of glass.

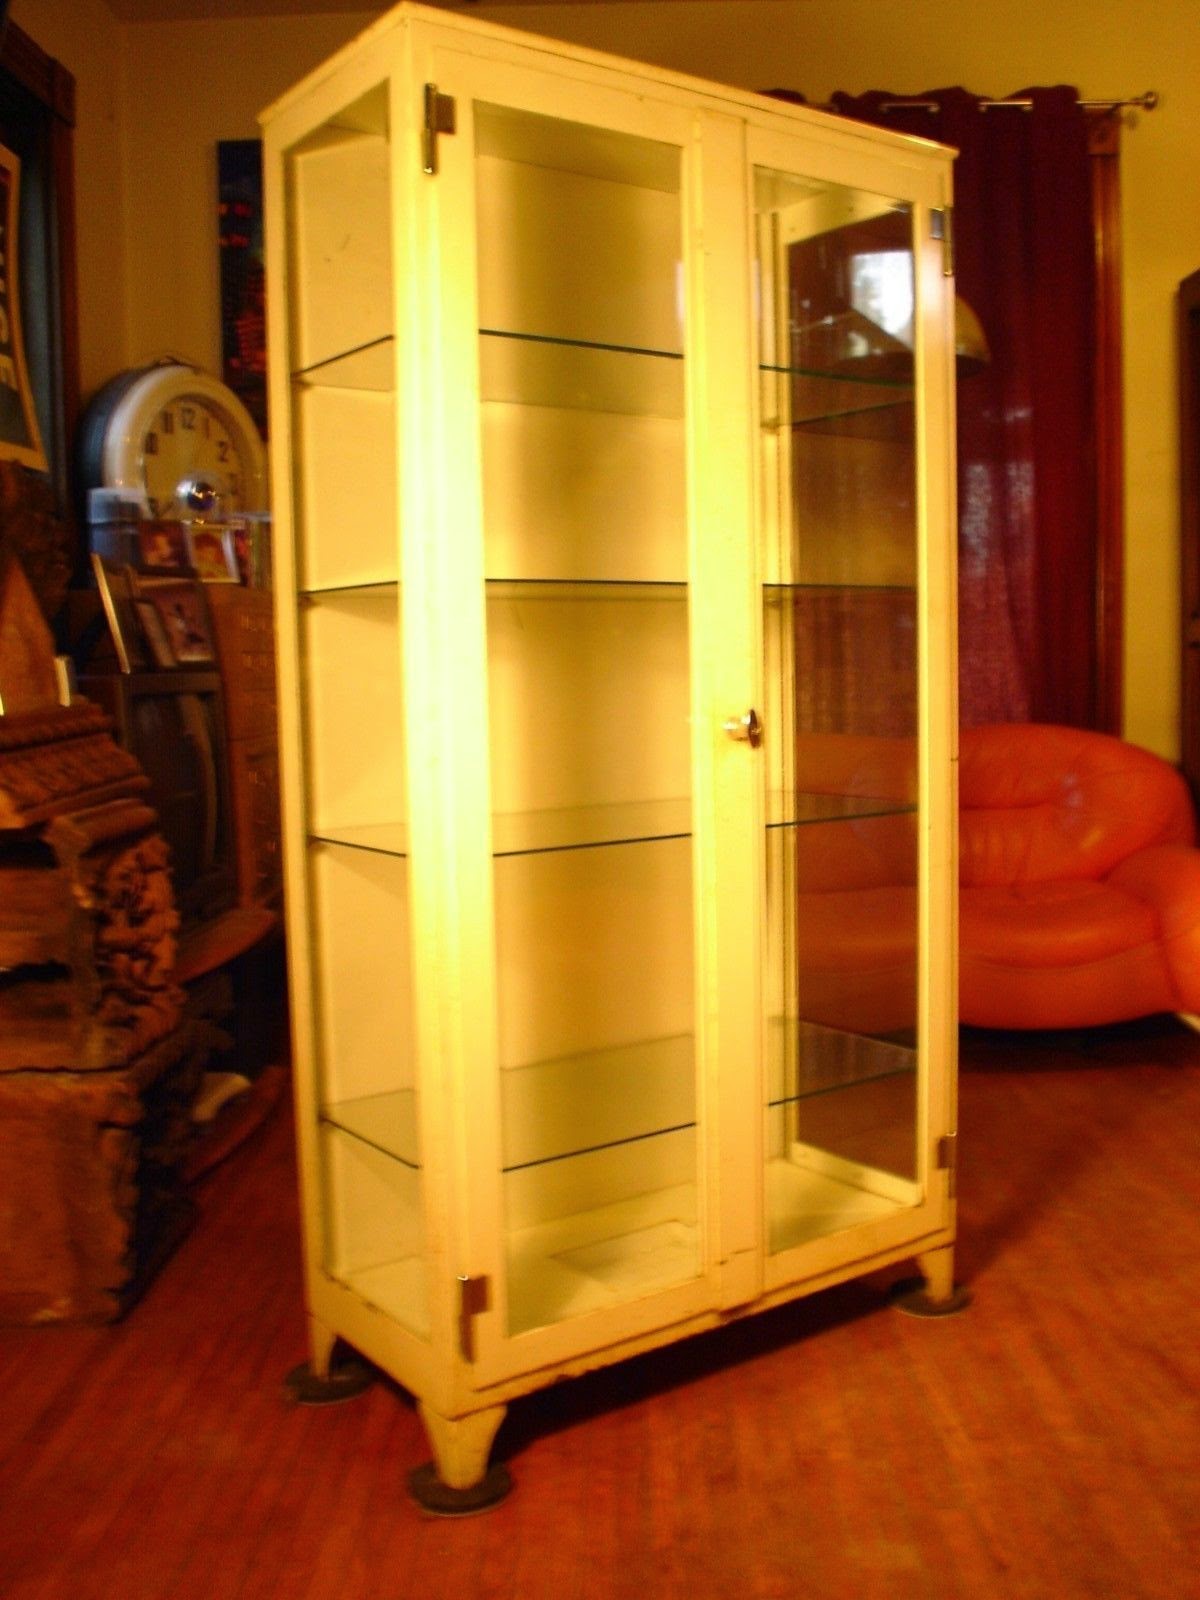
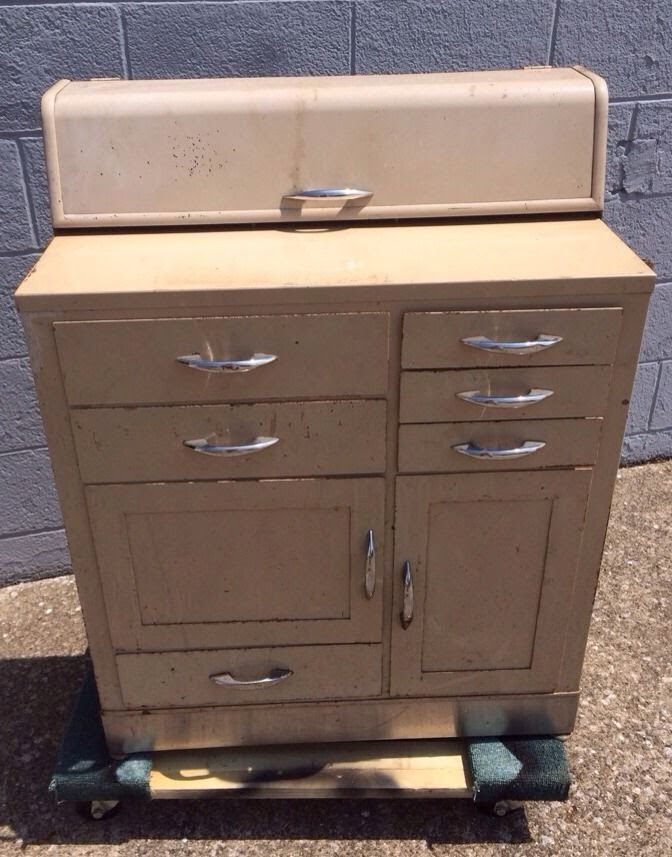
So, where am I going with all this?  Well, it reminds me of old fashioned (and new fashioned) medical/surgical cabinets like the ones below.  These are very paintable and nice I think.  These turn up on ebay and craigslist regularly.  What do you think of these?

1

2

3

4

5

6

7

8

9

10

11

12

Tuesday, September 16, 2014

DESIGN IDEA FULFILLED: Painted Plywood Floor

We have done a lot of posts about "Design Ideas" and, to date, I think only one of them has been completely fulfilled (see: the door in the window).

But about a month ago V and I finally accepted that we cannot afford to put down hardwood flooring any time soon so our tenants will just have to live with plywood floors in the master suite and in the Great Room.  The kind of folks who are likely to rent might actually get a kick out of this.


Happily, this realization coincided with the arrival at BIG NYC Queens of several pallets of a product called Basic 1 - Satin waterbased wood floor finish billed by the manufacturer as an "Economical Waterbased Floor Finish".  BIG had so much of it that they were giving away free, so I went out and picked up two cases (8 gallons) of the stuff.  I figured there was no reason to spend a lot of money on fancy urethanes since we're just putting it onto fairly rough 4'x8' sheets of plywood flooring and we intend to save up for the hardwood to sell the house with.

Anyway, around this time, my lifelong best friend B was on his way out from California to work on the house for a few weeks.  Having just quit my job, I was to spend my first week of unemployment up at the house with him trying to get some stuff done.  One of the first items on our list was to finish the floors.

Anyway, since the plywood looked pretty boring, V spent some time discussing what we might do to soup it up at low cost and in a way that might make it show better for both tenants and potential buyers.  As I left the house for a week upstate, I encouraged her to think about painting or staining or whitewashing the floor and send me photos.  I might even have suggested that we could be "whimsical".  Anyway, the two posts immediately prior to this one are her responses to that suggestion. 

We agreed to just whitewash the master suite floor, so B got to work on that.  Despite some serious problems with the whitewash product drying too quickly, that floor came out looking pretty good.  After 3 coats of the Basic 1 Satin, I think it is about as good as it is going to get - certainly good enough to walk on and for tenants to lay some rugs on.


Based on the look of the master suite floor, I decided I did not want to use the same look on the Great Room floor so I went back and looked at V's inspirational suggestions.  As I looked through the photos V had posted, this one particularly caught my eye - I love the worn look and the variation of pattern and color while still maintaining the repetition - I know I'm not going to live with this myself, but that's no reason to suppress whimsy - If we love it, then maybe someone else will love it too.  Or at least that's how the thinking goes.

I was pretty hungry and in no condition to be making big decisions, but I said to B, "Hey! We could do that!"  I think his response was a fairly unenthusiastic, "yeah.  We could do that."  He wasn't thrilled about all the work that was going to go into painting a bunch of different color squares.  The fact is that he didn't really know what I was suggesting at the time and if he had known, he would have talked some sense into me.  Fortunately, he did not.

We discussed it briefly and I jumped in the car and headed to Home Depot to buy some cheap house paints in a variety of colors.  But before I got to HD, I swung into the parking lot of the Habitat For Humanity Restore.  One of the guys took me downstairs and showed me all the rusting gallon paint cans people have left on their doorstep.  I ended up taking 8 cans and zipped back up to the house stopping only for beer and hotdog fixins - workmen have to eat too, you know!

We set up a paint mixing station and got to work stirring the cans (most of which dated back to around 2005) to see what they looked like.


When all was mixed and ready, we had a pretty good bunch of colors (and beers) to start working from.

Next, we began laying out the design on the floor.  My first estimate was that it would take about 8 to 15 minutes to lay out each 4'x8' sheet before beginning to paint and that we could mostly finish the paint job in one night.  

We set to work around 8pm.  B made the club-star stencil while I focused on pencilling in the design on the floor.  Laying out the design was much harder than I had expected and being down on my knees on that floor was not at all comfortable.  We decided to lay it out sheet by sheet and paint as we went.

Fair to say that B was right and I was wrong about how long it would take.  The next morning we had not accomplished a whole lot.  But it was enough to convince me that I really liked the look of it and we had to keep going.  If it looks this good now, I told myself, just wait!! People are going to be clamoring to rent/buy that crazy round house with the groovy hand-painted floors.

We spent the whole of the next day on our knees laying it out mixing paints and filling it in and with every square we completed, I got more excited.

I had to get back to V and S before we were completely done so I left B up there to finish it and seal it.  I didn't see it again for two weeks and, when I did, this is what I saw:
(The registration marks in the doorway were my idea - I'm pretty pleased with how they came out.)


It is still plywood, but I am super happy about this!!  SUPER HAPPY!!! (not a feeling I have had often on this project).  B did an amazing AMAZING job!!
I have to be honest and concede that it is probably not increasing the rental or resale value of the house a whole lot more than a clear coat of satin would have, but it brought a little joy to a project that is proving pretty joyless (and financially difficult) of late.

Tuesday, August 26, 2014

More Floor Palettes


Love this! looked more blue than grey in another version of the pic, which I liked. Like the darkest is steely midnight and the lightest is greyish white. I think this is the only palette I've picked that could conceivably be different values of the same color.  Seems pretty tenant friendly too.  Not too artsy.


I like this green. variations on this.


I think a pink like this and a cooler grey/white would be calming.


Same greeney color, next to some kind of white and/or neutral plywood color. I still like the idea of leaving a little negative space. 


Love this and seems totally doable. Not whimsical enough?


Wasn't thinking about yellow but I LOVE this combo. Sort of a marigold color and charcoal and white. ARG, I know I keep picking things with three diff colors in them which is making things harder, it just looks so cool! I like the contrast.  

But then, I guess we don't have to live with it, so you make the call.  What is best for bidniss?

Painted Patchwork Floor Ideas

Hello, I'm getting on board with the "whimsical" idea but still not going as crazy with color as maybe you'd like. Can I ask, is "whimsical" something you're thinking of doing because it fills your bucket or because it is actually good for rental/resale?  Isn't this edifice already pretty whimsical without going colorwacky on the innards?
Here are some color combos I like. Not quite a variation on one color, but I'm looking.
I should just say that I LOVE pretty much all the stenciling ideas that are out there, especially these geometric shapes, but I realize that is a ton of work and not what we are talking about. I was just looking for examples of these colors next to each other on a floor. So yes, I love these entire looks including pattern, but I am just posting them here to show color palettes. I'm down with painting one board at a time, but also like the checkerboard look as well as more complicated stenciling.

Will keep looking for one color light-to-dark schemes.  Just remember, I'm telling you what I'd be happy to live with, but I have no idea what tenants (especially country-folk tenants, or city-folk vacationer tenants?) or buyers will go gaga over.

\

Really love this shade of blue if you wanted to do one solid color or variations on one color, but I actually like this combo more. Realize that is lots of colors, but it could be black/blue/whitewash/ and negative space plywood.


I like this scheme also. Greeny grayish to yellow and white. Ugh, too many cans of paint.


There's a whole bunch of stencil options on the internets, which is more work BUT in a way maybe it's more forgiving? Paint a darker color, dark grey or blue, underneath and do a white stencil over? I like this one where it is not such a crisp line, not sure how to achieve that. Or even just white stencil over clear-coated plywood, for texture and to cover unevenness. Again, more work but maybe more forgiving overall than trying to get a solid, even color.


Same principle here, and it is pretty and rustic. Could do patchwork style by painting each board OR I like the checkerboard a lot too. Maybe way too much work but there are plenty of tutorials. Just make sure there is a square on the dog puke spot.

Saturday, July 26, 2014

UpState Update: Two Floors Nearly Finished!!

We went up to the house yesterday and LO AND BEHOLD! it is a dwelling!!  We might be closer to turning some income out of this monster than I'd been thinking.  (there's been a lot of depressed thinking and check-writing lately.)
Just look at these pix:
 This is the Great Room (that is what we have decided to call the main floor which houses the kitchen, living room, dining room and staircase up to the Master Suite).  The plywood floor is down, the kitchen floor is tiled and all the windows and doors have been trimmed out.  

Take note of that last item: doors.  That door over there on the right is new!  It is the entrance from the entry structure into the upper two floors of the house.  My idea!!  This has the added benefit of trapping heat in the great room and upper floors so that winterizing is cheaper and/or winter renters can just dwell in those upper spaces and skip the chilly bottom.

This is the view from the upper landing in the entry structure (door slides into the wall at left):

And this is the view from inside the Great Room looking toward the landing (door slides into the wall at right):


And here is the view of the inside of the entry structure seen from the upper landing outside the Great Room.  The new thing here is the three big beams you see which intersect just above center (not the ugly 2"x8"s in the foreground in the lower center - those are just safety rails until we get a real railing installed).  These beams replace a bunch of ugly framing elements that would have required sheetrocking over them.  We used 4"x11" rough cut maple beams so, in addition to being big and cool looking, they are a lovely wood.  This is one choice I think definitely improves resale value - good use of local lumber.  We can market that the way folks do: Features Locally grown sustainable hardwoods! YEAH!!

And looky looky!!! Big update in the Master Bath.  The shower glass is installed!!  We finally have a complete shower enclosure!  It is pretty exciting.  We still need the fixtures to be installed, but the glass looks amazing.  The shower is the nicest (and most expensive) room in the house -- way nicer than any bathroom in our place and nicer than any bathroom we expect to have in a house we live in anytime soon (maybe once we rent/sell this place we will be able to afford a nice bathroom of our own).  Note also that the bathroom door has also been installed.

Here is the view of the bathroom door from the Master Bedroom side:

Oh, and finally, the steps have been installed on the back deck.  We are hoping that the inspector does not require us to install railings since it is such a short staircase.

Please don't ask what is left to do.  There is a lot.  Off the top of my head, we still have to do the following: The main staircase from the Great Room to the Master Suite needs to be completely re-built.  The staircases in the entry structure need to be built since the ones we have in there now are just utility staircases for the construction period.  We need all surfaces finished (painted or varnished).  Plumbing fixtures need to be installed.  A lot of electric boxes need to be finished so that fixtures can be hung.  The floors need to be sanded and sealed.  Closet doors are needed in the bedroom.  We need a new hearthstone and we need to tile, stone or otherwise finish the fireplace surround and chimney.  Oh, and did you notice that there is no kitchen in the kitchen (maybe we'll leave this for a buyer? but if we rent it first, we'll have to put in some basic kitchen stuff)? And that is just the stuff I can think of.  So, there is a lot to do.  

Oh, and there is also the ground floor with two bedrooms and a bathroom which has not been touched for over a year and which we are just going to board up and leave for later.  If we're selling, that's less important than if we're renting.  Extra bedrooms is extra rentful magic.

Sunday, July 13, 2014

UPSTATE UPDATE!!! SERIOUS PROGRESS!!!

I spent the day up at the house and in the nearby environs yesterday and, for the first time in ages, I am happy to report that we have made some good progress.  

Remember this heap of gauged black slate floor tile?  I bought 270 Sq. Ft. of it at a stoop sale last fall from a woman who bought it in the early 70's planning to re-do her kitchen but then never got around to it. (Here's a link to the post about it.)

Well, look at it now!!


Anyway, after three and a half years collecting old materials in hopes I can repurpose them in our project, I believe this is the first time that any of those old materials have been successfully installed in our house.  I am very happy with the results.

And, here is another development - We had the bedroom floor re-covered in a layer of half inch plywood.  We are going to varnish or paint it and then live with it until we can afford a real hardwood floor (which could be a very long while if we are happy with the painted floor).

I am feeling a little better about our project at the moment.